Fetch data from custom sources
❗ Important: The documentation in this topic refers to a feature or product that is currently in Early Availability status. Features in Early Availability status are only available in production to a limited number of customers based on fit with specific use cases. For more information about Early Availability status, see Product lifecycle phases. If you would like to use the product capabilities described here during the Early Availability phase, contact your AppDirect technical representative.
Our custom data tools are designed to make it incredibly easy for users to connect unique data sources to their dashboards. The new Fetch Data tool has replaced our legacy Pull API functionality, empowering users to connect to any URL, provide their authentication, and write necessary JavaScript directly within the AppInsights app. This means no more infrastructure costs to execute your scripts and you can now retrieve endpoint data for almost any open API.
Prior to using this walkthrough, you may be interested in reviewing our full API documentation for more context on the technical capabilities of the Fetch Data tool.
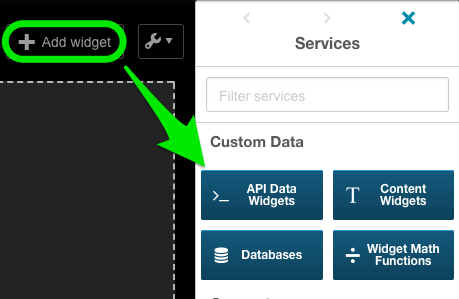
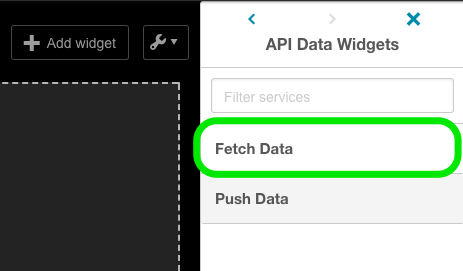
To get started, navigate to the Services pane, select the API Data Widgets tile, and then the “Fetch Data” option. You will be presented with a list of visualization options to choose from.


Select your visualization and you will notice that a new widget will appear on your dashboard. Any time a new custom data widget is deployed to the dashboard, it will need to be configured. To get started, click the gear icon and navigate to the “Edit Widget Settings” menu.

From the “Data Settings” tab, you can input your URL, any required authentication information—Basic or custom headers—and any JavaScript required to modify your data and/or convert it to AppInsights’s native format.

Authentication methods
Please note that there are several different types of authentication that are commonly used by APIs. Currently Fetch Data only supports Basic Auth, Custom header authentication, and API keys in the URL. Unsupported methods include OAuth (both 1.0 and 2.0) and signatures.
Here is a short description that will help you identify each of the authentication methods mentioned above.
Basic auth—Consists of a username and password that is base64-encoded and passed into the HTTP “Authorization header.
Custom Header Authentication—Same idea as basic auth but can contain more information in headers. Fetch Data supports up to 2 header-value pairs.
API Key in URL—The API key is directly built into the the URL. In this case, simply select “no-authentication” and submit it in the URL field. Exception.
Test your script
As an additional tool, you can test your script while in this menu by clicking on the “Run” button for testing. The results of your script will then be displayed in the “Results” field, where you can check for proper formatting or just to verify your data.

Script
By default, there’s a simple command that should return the raw data already in the Script field.
return JSON.parse(data);
Click “Run” and the results appear in the Results field. Here is a sample response for your reference:
{
"query": {
"count": 1,
"lang": "en-US",
"results": {
"quote": {
"PriceBook": "4.08",
"OneyrTargetPrice": "946.22",
"DividendShare": null,
"ChangeFromFiftydayMovingAverage": "24.81",
"ExDividendDate": null,
"SharesOwned": null,
"PricePaid": null,
"DaysLow": "793.27",
"DividendYield": null,
"Commission": null,
"EPSEstimateNextQuarter": "9.31",
"ChangeFromYearLow": "133.36",
"FiftydayMovingAverage": "771.61",
"EarningsShare": "27.32",
"AverageDailyVolume": "1753360",
"DaysRange": "793.27 - 798.65",
"MoreInfo": null,
"EBITDA": "28.29B",
"Change_PercentChange": "+2.22 - +0.28%",
"AnnualizedGain": null,
"ShortRatio": "1.18",
"LastTradeDate": "12/20/2016",
"PriceSales": "6.40",
"EPSEstimateCurrentYear": "34.44",
"BookValue": "194.60",
"Bid": "795.00",
"AskRealtime": null,
"PreviousClose": "794.20",
"EPSEstimateNextYear": "40.91",
"Volume": "950959",
"HoldingsGainPercent": null,
"PercentChange": "+0.28%",
"TickerTrend": null,
"Ask": "796.23",
"ChangeRealtime": null,
"PriceEPSEstimateNextYear": "19.47",
"HoldingsGain": null,
"Change": "+2.22",
"YearHigh": "816.68",
"Open": "796.76",
"MarketCapitalization": "548.92B",
"Name": "Alphabet Inc.",
"HoldingsValue": null,
"PercentChangeFromTwoHundreddayMovingAverage": "+4.97%",
"AfterHoursChangeRealtime": null,
"symbol": "GOOG",
"ChangePercentRealtime": null,
"DaysValueChange": null,
"LastTradeTime": "4:00pm",
"StockExchange": "NMS",
"DividendPayDate": null,
"LastTradeRealtimeWithTime": null,
"Notes": null,
"DaysRangeRealtime": null,
"PERatio": "29.15",
"DaysValueChangeRealtime": null,
"ErrorIndicationreturnedforsymbolchangedinvalid": null,
"ChangeinPercent": "+0.28%",
"YearLow": "663.06",
"DaysHigh": "798.65",
"PercentChangeFromFiftydayMovingAverage": "+3.22%",
"PEGRatio": "1.23",
"ChangeFromTwoHundreddayMovingAverage": "37.71",
"HoldingsValueRealtime": null,
"PercentChangeFromYearLow": "+20.11%",
"TradeDate": null,
"LastTradeWithTime": "4:00pm - <b>796.42</b>",
"BidRealtime": null,
"YearRange": "663.06 - 816.68",
"HighLimit": null,
"OrderBookRealtime": null,
"HoldingsGainRealtime": null,
"Currency": "USD",
"LowLimit": null,
"HoldingsGainPercentRealtime": null,
"TwoHundreddayMovingAverage": "758.71",
"PERatioRealtime": null,
"PercebtChangeFromYearHigh": "-2.48%",
"ChangeFromYearHigh": "-20.26",
"PriceEPSEstimateCurrentYear": "23.12",
"LastTradePriceOnly": "796.42",
"Symbol": "GOOG",
"MarketCapRealtime": null
}
},
"created": "2016-12-21T00:02:49Z"
}
}
Next, because the data returned is JSON, we parse it with the JavaScript JSON tool and save that as the variable “data” (1). We can use the function “parseFloat” to select just the price resource (2). Then we will return that price in the AppInsights format and as a bonus, we can append a dollar sign prefix (3).
data = JSON.parse(data);
price = parseFloat(data.query.results.quote.LastTradePriceOnly)
return {number: price, prefix:"$"}
Click “Run” again and you should see the result.
{
"prefix": "$",
"number": 728.330017
}
If your results differ, double check your script and use the “Run” button to debug successive versions. Remember, the data must be in the AppInsights format if they are to render properly in the widget.
Once these fields have been entered, select your Fetch Interval—10sec minimum / 24hr maximum—and click “Save” to populate your widget.
Was this page helpful?
Tell us more…
Help us improve our content. Responses are anonymous.
Thanks
We appreciate your feedback!